I had to make some partitioning changes on few machines. The thought of doing it manually, one by one was depressing. So I spent some time reading and playing with DiskPart and saved myself precious time.
DiskPart is a text-mode command that enables you to manage objects (disks, partitions, or volumes) by using scripts or direct input at a command prompt.
DiskPart is present in XP, Vista and Windows 7. The XP version is more limited because it does not offer advanced features for resizing partitions.
It is a powerful tool that can be used in many ways. I'll go over some basics.
Before you can use DiskPart commands on a disk, partition, or volume, you must first list and then select the object to give it focus. When an object has focus, any DiskPart commands that you type act on that object.
To start the tool, all you have to do is type DiskPart in command line. You'll get a new prompt with the DISKPART> sign replacing c:\
The tool uses two types of commands:
1. Commands which specify the target of action: List, Help, Rem, Select, Exit
2. Commands that apply directly to the element: Active, Assign, Create, Extend, Shrink
You can resize partitions, add or remove them and generally speaking do most of the FDISK or Disk Partition utility functions
One big advantage for DiskPart is it's scripting power. You can use it in script for a range of tasks.
To initiate a Diskpart script, use the diskpart /s script.txt command. By default, Diskpart can quit command processing and return an error code if there is a problem in the script. To continue to run a script in this scenario, include the noerr parameter on the command.
Check the Microsoft Command-line page for DiskPart
DiskPart is a powerful tool. Make sure you're familiar with it and use it carefully
Tuesday, September 15, 2009


Monday, September 14, 2009
Wi-Fi 802.11n approved - do I care?

The technical blogosphere is buzzing. BBC, CNET, neowin and everyone else cover the approval of the 802.11n high-throughput wireless LAN standard by the IEEE.
It took almost 7 and we have a 6 time faster wireless connection. Most vendors already use it or require a firmware upgrade for the existing hardware.
As always, I try to look at the news in the OneManITShop eyes:
How would it change MY life?
Will it make a difference to MY Shop?
Networks that already use wireless will be better off upgrading to the new standard if hardware permit. But under the current economy I wouldn't invest in new hardware unless you work with huge files or video (but then, why are you on wireless?).
If you're just on the verge of installing a new wireless network or expand the current infrastructure you have to make sure 802.11n is supported. The problem is you 'll have hard time any piece of hardware that does not support it so it is a non issue.
The big difference would be for those who try to make a case for wireless. If you're one of those your case got 6 times stronger. Since most PCs come with a Gig NIC I see the network as the bottleneck and this is where you can make your case: Using 802.11n get you closer to the Gig NIC but with the flexibility of a laptop. You do not compromise that much on bandwidth as you had to with previous standards and you get to keep the wireless environment.
I see it as a big plus. With the right rap your management will too.
Friday, September 11, 2009
Domain Trust – part III
Part I covered the basic concept of Domain Trust.
Part II covered the different Trust types.
Now it’s time to go over Trust related troubleshooting skills
The first step is determining the type of Trust. There are few ways to complete this task:
Active Directory Domains and Trusts console - The Domain ‘Properties’ box has a Trusts tab with all available Trusts for the Domain
Active Directory Users and Computers console – For the Domain, the View menu has an ‘Advanced Features’ option. The ‘System’ container has a list of objects; we’re looking here at the ‘Trusted Domain’ type.
NLTEST - Resource kit tool that can display Trusts (among other data). The following command will show all trusted domain:
NLTEST /server:server name /trusted_domains
ADSI Edit – Another Resource kit tool that can do the job. Expanding the domain in question and browsing to the System class properties will give you the list of Trusted domains.
Each of these provides significant data on the Trusts and related problems. Make sure you’re familiar with each one of them and capable of using them if required.
WinNT presented a great tool that survived till this day: NLTEST
NLTEST test secure channels between domain controllers that trust other domains.
Though it is a WinNT document, this tool work great on every domain level and like the previous list, it is a very important tool that should be available and used by any domain admin.
Part II covered the different Trust types.
Now it’s time to go over Trust related troubleshooting skills
The first step is determining the type of Trust. There are few ways to complete this task:
Active Directory Domains and Trusts console - The Domain ‘Properties’ box has a Trusts tab with all available Trusts for the Domain
Active Directory Users and Computers console – For the Domain, the View menu has an ‘Advanced Features’ option. The ‘System’ container has a list of objects; we’re looking here at the ‘Trusted Domain’ type.
NLTEST - Resource kit tool that can display Trusts (among other data). The following command will show all trusted domain:
NLTEST /server:server name /trusted_domains
ADSI Edit – Another Resource kit tool that can do the job. Expanding the domain in question and browsing to the System class properties will give you the list of Trusted domains.
Each of these provides significant data on the Trusts and related problems. Make sure you’re familiar with each one of them and capable of using them if required.
WinNT presented a great tool that survived till this day: NLTEST
NLTEST test secure channels between domain controllers that trust other domains.
Though it is a WinNT document, this tool work great on every domain level and like the previous list, it is a very important tool that should be available and used by any domain admin.
“Restricted Groups” in Group Policy

Ever had to add users to a local admin group but had no access to the computer? Add a special user account in the Administrator group of every computer on the network for remote administrative functions?
Group Policy Restricted Groups enables you - as the administrator - to configure group memberships on the client computers or member servers. Cool. Useful!!!
The “Restricted Groups” option allow 2 types of settings:
Members
Members Of
Members– This setting allows you to control the members of the group that you specify for the policy. The members can include both user and group accounts. When you configure the members of a group, it will overwrite the existing membership of the group and replace the members with those specified within the GPO. If you were to configure this setting and leave the members blank, then the group would not have any members after the GPO applied to the computer.
Member Of – This setting allows you to control which other groups the specified group has membership in. All groups that you configure in this interface must meet the approved group nesting rules. Therefore, you can’t configure a local group to have membership in another group, since local groups can’t be placed in Active Directory groups, nor placed in other local groups. If the list of groups in this section is left blank, it will not remove the specified group from any existing groups, it will just not place it in additional groups.
Simple yet an efficient time saver.
Derek Melber wrote a good security piece on restricted groups
Thursday, September 10, 2009
Well, this is embarrassing
After a long weekend and first day of school I walked in today and started my Firefox browser. After few seconds it crashed. up to this point, nothing much to tell about, happen every once in a while.
The story is the recovery process. When Firefox crashes it is coming up again and recovering all web pages so other then the irritating process, you do not have a real damage (though it is annoying). But this time I got a new message...

The story is the recovery process. When Firefox crashes it is coming up again and recovering all web pages so other then the irritating process, you do not have a real damage (though it is annoying). But this time I got a new message...

Thursday, September 3, 2009
Netsh.exe - DHCP backup and more

Early this morning I had a problem on one of my DHCP servers. One scope got messy and I wanted to get it fixed fast enough so ealy birds coming in will not notice the problem.
Lucky me i had a recent backup of my DHCP so all I had to do was restoring it to the server.
Netsh.exe utility is a functional tool that can be used for many tasks around your domain. my particular task here was importing the backup file I created as part of my DR plan.
Running the tool on the actual DHCP server those are the required commands:
netsh
dhcp server \\servername
EXPORT
export c:\backup\dhcpdb all (all=>backup ALL scopes)
or
export c:\temp\dhcpdb 192.168.20.0
IMPORT
import c:\backup\dhcpdb all (all=>import full config)
or
import c:\temp\dhcpdb 192.168.20.0
This is a very simple procedure that can save you time when DHCP fail.
You can use this tool for many more tasks, monitoring your system from command line.
Tuesday, September 1, 2009
How to change Drive Letter display
A simple request from a user made me work a bit before I found this neat solution:
Mapped drives at Windows Explorer are display by default as:
- (OneManITShop Data on FileServer\ShopData M:)
A much easier way to see it, and this users requrested just that is the other way around:
(M: OneManITShop Data on FileServer\ShopData)
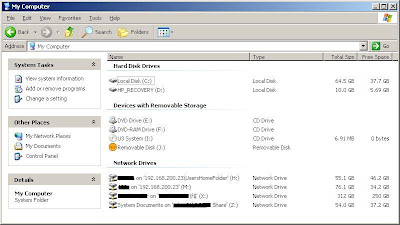
An easy solution (I do not use 'the solution' since some other solution available out there) is a simple Registry change:
In regedit (type regedit in command line)look for the following key: HKLM\Software\Microsoft\Windows\CurrentVersion\Explorer
edit or create the DWORD value "ShowDriveLettersFirst" and set it to the desired value:
* 0 = Default display (drive letters after description)
* 1 = Network drive letters first, Local drive letters after
* 2 = Descriptions only, no drive letters displayed
* 4 = Drive letters before description
My user's request required option 4. Happy user at the end of the day :)
Mapped drives at Windows Explorer are display by default as:
A much easier way to see it, and this users requrested just that is the other way around:

An easy solution (I do not use 'the solution' since some other solution available out there) is a simple Registry change:
In regedit (type regedit in command line)look for the following key: HKLM\Software\Microsoft\Windows\CurrentVersion\Explorer
edit or create the DWORD value "ShowDriveLettersFirst" and set it to the desired value:
* 0 = Default display (drive letters after description)
* 1 = Network drive letters first, Local drive letters after
* 2 = Descriptions only, no drive letters displayed
* 4 = Drive letters before description
My user's request required option 4. Happy user at the end of the day :)
Subscribe to:
Posts (Atom)


